


Follow our step-by-step guide for easy gallery wall tips and creative frame wall ideas!
Every home needs a beautiful photo gallery wall. They just never go out of style.
However, as you gaze up at that huge blank wall space you’re dying to fill, starting a gallery wall from scratch might seem a bit daunting. After all, where do you even start?
There’s no need to panic, because we’ve put together a step-by-step guide on how to make a photo gallery wall in your own home. Better yet, these gallery wall tips and frame wall ideas are super-easy to try yourself!
1. Pick the perfect display wall

Let’s start with the obvious: you need to choose a wall to actually display your photo gallery.
The most important thing here is measuring the space and making sure it’s big enough for what you want to do. You’ll also want to consider the colour of the wall and the room it’s in, as this will have a huge impact on your photo gallery theme and the style of frame you go for.
Feature photo walls look just as fantastic in the living room as they do on the stairs, so you should think carefully about which wall gets the best natural light and will draw the most eyes!
2. Create a photo gallery theme

When creating your own unique photo gallery wall, the possibilities really are endless. Seriously.
Although you might want to use art prints, inspirational quotes or drawings the kids have done, the most popular home gallery walls feature happy family photos. Let’s face it, there’s nothing quite like a wall filled with your favourite smiles and memories.
Whether you’re using photos of the kids, a sunny holiday or a magical wedding day (or a mixture of all three), your theme will have a huge impact on which frames and photos you choose. You might even decide to print photos in black and white!
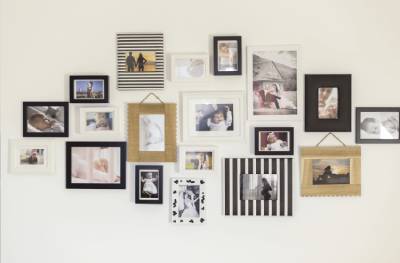
3. Choose frames you love
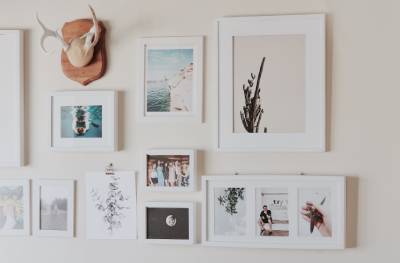
Now then, you’ll want to choose frames that not only fit into your wall space, but also match your theme and the overall decor of your room.
The first thing you’ll need to decide is whether to use frames all in the same style, or whether to mix things up with different colours, materials and shapes. For example, creating a photo wall with only black frames will keep things sleek and modern, while mismatching these with wooden frames would offer a more vintage style.
Since your choice depends on your room, theme and decor, there really is no wrong answer here. Just browse through our huge selection of photo frames for inspiration (we can even create completely bespoke picture frames just for you)!
4. Print your favourite photos

The most important part of creating your photo gallery wall is… well, your choice of photos! Remember: getting treasured memories on the wall is probably why you started all of this in the first place.
Since the perfect photos are probably already sat on your phone, computer or social media pages, you’ll just need to do some digging to find snaps that always make you smile. Once you’ve found photos deserving of a place in your gallery wall, simply get them printed in all shapes and sizes at your local Snappy Snaps! Easy peasy.
5. Design your photo wall
Right then, your framed photos are now at the ready, so it’s time for the fun part!
Before you start hanging anything on the wall, you’ll want to measure out the same space on your floor and start experimenting with your photo wall layout. This is obviously a much easier way to move frames around and ultimately design the photo wall you’ve been dreaming of.
It’s always a good idea to position the biggest frames first, and then get creative with smaller frames to fill in the gaps. Once you’re happy with the layout on the floor, you can remove the paper inserts from your frames and stick them on the wall, just to make absolutely certain the layout works up there, too!
6. Hang your framed prints

Let’s be honest, this is where things can get a little stressful. Loads of people worry about hammering nails in the wrong place and getting the alignment all wrong, so here are some (hopefully) helpful tips on how to hang your photo gallery wall:
-
Stick the paper inserts from your frames in the exact position you want them on the wall. Use a spirit level to make sure everything’s straight.
-
Turn your frames over on the floor and measure from the top of each frame to the fixing
-
Measure the same distance on your paper inserts and mark it with an “X”
-
Carefully stab the nail through your mark on the paper and hammer it into the wall
-
Rip the paper inserts away (leaving only the nail on the wall) and then hang your framed prints!
7. Sit back and enjoy your happy memories!

Once you’ve done all that, you can sit back, relax and soak up the happy memories you’ve just got up on the wall. Go ahead and put your feet up, you’ve earnt it.
From framed prints to supersized canvases, explore our complete range of beautiful wall art to get started on your own photo gallery wall!